
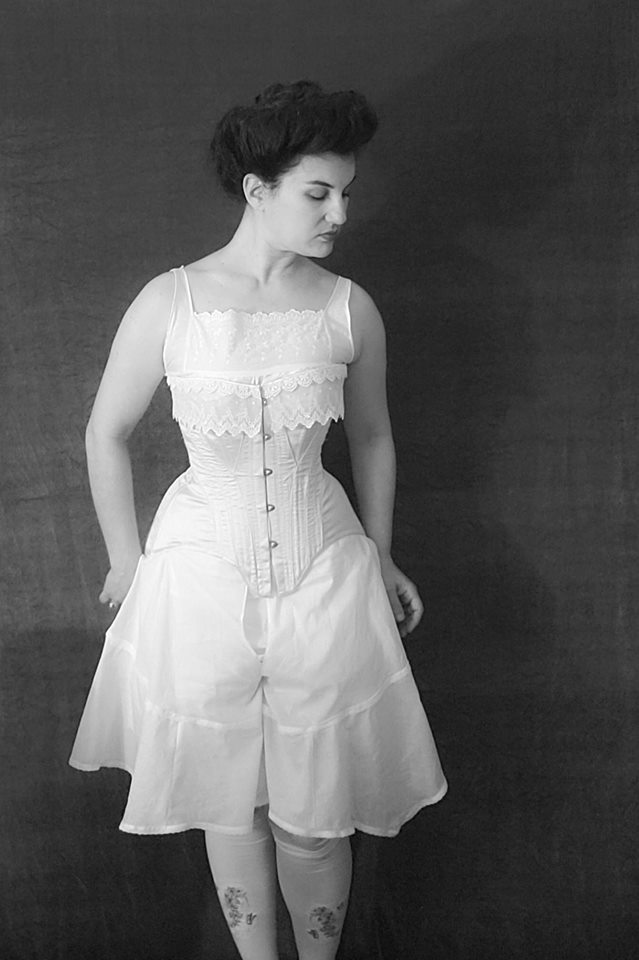
Every new era starts from the inside out so when I decided to delve into the Edwardian era, I knew an S Bend corset was in my future. It was actually called a Straight Front corset during the era and caused the wearer to pitch slightly forward with a pronounced backside. Padding was often used on the bust and hips in order to emphasize a small waist. I found this idea fascinating. Instead of tightlacing and forcing the figure to conform, one instead used padding and underthings to create an illusion. In my case I did not need padding on the bottom but will probably make what is called a bust improver for the top to further make my waist look smaller. It should be noted my waist reduction with this corset is minimal, at most 1/2 to one inch. I can probably do more once I have better lacing material but I am not interested in being laced in too snug.


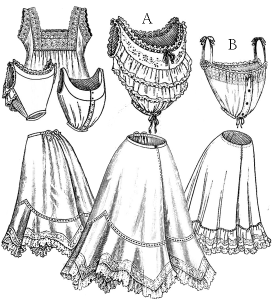
I bought two Truly Victorian patterns - TVE02E Edwardian Underwear and TVE01E Edwardian Corset S Bend.

I actually began with the corset even though the underwear was far easier. Sizing was a bit tricky. I was a size C however my hips dictated I needed a size D. So I cut out the C for all the front the pieces and on the back pieces I did a size C top piece graded out to a size D at the waist down. This ended up working out ok although I could have gone even a smidge bigger on bottom. I was a bit surprised by this as I knew this corset really emphasized wide hips and I thought I would be left with a little more room. However that is the nice thing about making it yourself, the opportunity to custom fit to your body! I used some scrap canvas material, spare twill tape and heavy duty zip ties to mock up. Unfortunately I seem to have deleted all the photos of the mock ups. However I now realize that despite trying to fit as best I could I didn't pay attention to the bust area enough. It was definitely too high. I have a feeling that would have been easier to understand had I studied the overall silhouette more and been wearing the chemise.
I chose a pretty peach dupioni silk for my fashion outer layer and a strong tightly woven cotton twill for the base. The corset pieces aren't so awful to construct but I struggled a bit with the directions, especially inserting the busk. I have never made a corset before and really needed clear visuals in order to understand. I have friends who can help me but I had some moments of frustration where I had to walk away for a bit. Thankfully the busk went in smoothly.

I should also note that I had a two day period where I kept inserting one of the bust gores backwards. Once I solved that crisis the bust gores were fine to sew up. I topstitched around the seams and did the bust gores before inserting the busk because I wanted the hard stuff out of the way.


Bust and hip gores in. Check out that topstitching!
The corset pieces came together pretty quickly after that. I pinned my layers together but as expected, there was wrinkling. I knew going in that it would be tricky but I was insistent on a silk fashion layer. I highly recommend labeling your pieces so you can keep track. I wrote lightly in pencil on the inside of all my pieces. At this point in the process, I took a break to sew up some other things. I ordered 1/2 inch wide twill tape to use as lining and still insisted on using zip ties for boning.

Already looking curvy despite no boning/boning channels

I pressed her and then she sat on my desk waiting impatiently
As mentioned, I planned on using twill tape for boning channels. The instructions gave an image of how they should be placed on the front, then simply stated to put on the back seams. Each channel is actually split in two, so I sewed the tape down on either side then went back and did a line down the middle. I was warned there may not be room for a boning channel on either side of the grommets and this was correct. I got one in on the back edge but that was it.

Grommets and zip ties in, ready for another try on
And then, as I was starting to feel good about the project, I got attacked by a needle.

The crime scene wasn't pretty
One spot of blood and I was ready to walk away! I blotted and hoped it would go away and it mostly did. At this point I was a bit discouraged already but I went ahead tried it all on.


You can see above there were some issues with the bust line but the overall shape was ok. I actually decided to then use this as a workable muslin but was encouraged to finish it. I decided to chop a little over half an inch off the top bust, which put the grommets very close to the top edge. I also felt the zip ties just weren't doing a good enough job. I ordered steel boning from corsetmaking.com and they arrived extremely fast!
I opted to make the underwear before another try on. I chose the basic yoke chemise and french drawers that had the handkerchief flounce. I was a straight size C for the chemise. They recommend you choose the drawers size based on your hips so I went up to a D and am glad I did. The one great thing about TV patterns is they include lots of measurements and a guide to figure out the fit.
The underwear is straightforward and easy. I opted for the drawers with the flounce. Lots of people do beautiful inset lace but I had none and wanted to stay within my budget. I used some small pretty eyelet trim instead with my thin cotton fabric and it turned out light and pretty! I want to go back and add more trim later on. Making Edwardian underwear was fun and I now understand why people go all out. So much floof!


Pretty satin bows on the split drawers and itty eyelet trim

Sewing the yoke on the chemise
The underwear was done so I went ahead and tried it on with the corset before binding it. I was very happy with the changes I had made and couldn't wait to finish.


The biggest improvement was to the fit of the back. You can see the grommets buckling and bending on the left (striped shirt) photo vs a nice line on the left with steel boning

Some fun side by side comparison with period picture


Lower bustline, steel boning = much happier


Corset is all done! Yay for two tiers of lace trim! And almost clean insides!
I finally had my Edwardian underthings done. I do need to make the garters, which actually are important for completing the look. They keep the corset line correct (and hold up the stockings!). I am proud of myself for attempting this as it my first corset I have ever made (if you do not include my stays). I learned a lot about curves and boning. Most importantly I learned that binding corsets is way easier than stays tabs! I will say that while I understand the corset pattern warns this is not a beginners sew I still found some of the instructions hard to follow. I like to have a lot of visuals to refer to.
I have included some pictures below. I really do want to try again, next time hopefully with smoother seams and less wrinkling in the hip gores. As usual, I learned more from actually making the item than simply reading about it. I have also included a list of blog posts after my photos by people who have also made this same pattern because perhaps that may be helpful to some.


Chemise and French split drawers


The shape of the French split drawers is very floofy and delicate


A friend made me custom stockings which paired nicely with my American Duchess Theda shoes


Also pleased with how my first attempt at Edwardian hair turned out
Other blog posts on making the Truly Victorian S Bend Corset:
Redthreaded discussing the corset (and you can buy one from them as well!)