Monday, January 2, 2023

The Pink Borgia Gown (1490s-ish)


Inspired by the 2011 television show The Borgias, I made a pink silk taffeta gown with gold silk dupioni and gold lace trim. The pink silk has some slubs to it and was a clearance find from Fabric Mart back in 2018. I loved the color and the slight texture in the fabric.  I wanted a historically inspired 1490's outfit and I especially based the gown on the costumes worn by Lucrezia and designed by famed costume designer Gabriella Pescucci. 


The costumes feature lush silks and vibrant patterned trim. Jewel tones were often used with a sheer camicia peeking out of the low neckline. I particularly liked the full upper sleeves that could feature one or two puffs. Pescucci was inspired by actual 15th century portraits and it shows in the overall silhouette. She definitely liked very wide hems for the skirts!

I actually did start with the McCalls 7763 pattern because I wasn't sure how I wanted to construct the bodice and the time period is new to me. I did not want to do a historically accurate costume so I was not very concerned with the pattern pieces being accurate. The pattern is fine if you really do not know where to start however I found it to not give me the shape I wanted. Even after I dropped the neckline when cutting it still did not fit anywhere. The front gaped horribly and the shoulders were ridiculously big. 
Way too big, too long, neckline and straps are not wide enough.

So, I started again. I took a basic bodice pattern I made a long time ago and just ignored the darts when tracing the pattern. I chopped the bottom to a couple inches above my natural waist. I cut two bodices out of canvas fabric. I pinned them together and machine sewed boning channels just in the front. I used my trusty plastic heavy duty zip ties for boning. I opted for a side zipper opening (more on that later).  Once I was satisfied with the try on I cut cotton flannel and the silk slightly bigger than the pattern and basted them together. I did this so that the cotton flannel would help hide the boning from being seen through the silk. I put the silk on the bodice in the 18th century fashion, laying it on and hand sewing it down first on front bodice then back. I then folded the excess over on neckline and armholes and whipstitched to the inside canvas.


As you can see the boning channels are literally only on the front and stop 2 inches from the side seam. They do not extend into the straps. 

Cotton and flannel layer on top and basted at neckline to check for that desired smooth front. 

Once the silk was on I turned my attention to the fastening. Historically the closures would lace on either side. On one side I hand sewed eyelets and laced silk ribbon through. This was a faux opening as it actually was sewn shut underneath. On the other side I put in a zipper and put a placket over it with eyelets to lace silk ribbon through (to hide the zipper). I am writing this blog post long after I actually made the garment ( I finished it October 2021) so I have some thoughts now that I can look back. I think when I was figuring out construction I wanted the ease of the zipper but the look of the eyelets. I am not very good at hand sewing eyelets and do not trust them to be sturdy enough on their own. I definitely did not want to use grommets because the metal would look very not historical at all. And wrapping thread over the grommets felt like too much work. I absolutely over complicated the entire thing. An added fun bonus was zipping myself in on a side seam in a very fitted boned bodice. I caught my skin on more than one occasion (ouch!). I still recommend zippers but NOT when you are using a bodice that will compress you. 

Working on the eyelets and zipper construction. I had to shorten the bodice twice (the pins marked the waistline I wanted).

Once that was done I turned to the skirt, which is a whopping 5 yard width. I wanted to do cartridge pleats at first but changed my mind halfway through. Instead I ended up pleating the skirts by sectioning the front and back in quarters and then again and again and again until it was all pleated into teeny tiny knife pleats. I pinned it all to twill tape and then hand sewed it down. I did this so I could place the skirt on the waistline exactly where I wanted before securing the twill tape to the bodice by hand. I hemmed the skirt with a very wide strip of light buckram fabric hand sewn to the inside to give the skirt more body. 
First try on with skirt to bodice before hemming. As usual I made it far too long and so it had a nice deep hem. 

The sleeves were next. I took my regular sleeve pattern and cut two out of regular white cotton. These were the under sleeve and somewhat fitted. The silk sleeve was far far wider and I gathered it up at the top and then attached it to the cotton undersleeve. I gathered the sleeve halfway down to create a double puff and gathered it again at the bottom and attached that to the bottom of the white cotton undersleeve. As you can see in the photos below, the cotton undersleeve is noticeably shorter in length. I did this on purpose so that the silk would puff out more.  I love that the sleeves tie on because it gives you endless options. I still have some silk left to make more sleeves in the future. 


The white undersleeve is shown with the silk under. I sandwiched the right sides together with ribbon straps in it then flipped the silk out to create a nice clean finished hem on top. The sleeves attach to the bodice with ribbon ties. 

I dug out some old gold silk dupioni to use for the bands at both the center gather and bottom. I then machine sewed it down with narrow gold braided trim I found at Joanns. 


For the lower half of the sleeves I created a tube and fitted it to my lower arm right under my elbow. I scalloped the sides and attached ribbon ties. This would created an opening for the camicia sleeves to puff out. I did a white cotton lining and once again placed right sides together (with ribbon ties sandwiched in) and sewed up on either side. I turned right side out then just folded down the top and bottom inward. 

 Before trim, hand sewing the top and bottom for a clean hem.

Random picture of me trying on the lower sleeve with the upper before I finished gathering the bottom edge.

 I was almost done and on to the fun part! I always enjoy trimming and for this gown I wanted a lot of beads. I found a great almost lace like looking gold trim and added pearl and gold beads. I added the neckline, waist seam, and sleeve gold trim. 


I did not follow the general rule of working from the inside out. Usually this is very important when fitting but I already knew that I wanted to create a camicia differently. I took a ribbed camisole tank top, flipped the back to the front (for lower neckline) and attached wide gathered sleeves of silk chiffon, because Lucrezia's costumes all appear to be sheer silk. I then cut out a wide strip and gathered then attached to the neckline of the camisole. I thought I was being very clever in not having to use a ton of silk chiffon and make a full camicia. If I did it again I'd suck it up and make a regular one however it works great and saved me money. 


Finally it was time to take it all out for a spin! When I first planned on making the costume I had no event to attend. I simply just wanted to make it. However it turned out the Sistine Chapel Experience was coming to town and Vivien of Fresh Frippery and I decided to attend in costume. She made a fantastic Loki Borgia (you can read the making of it here) and off we went! I'm glad we took a little time to take photos. 


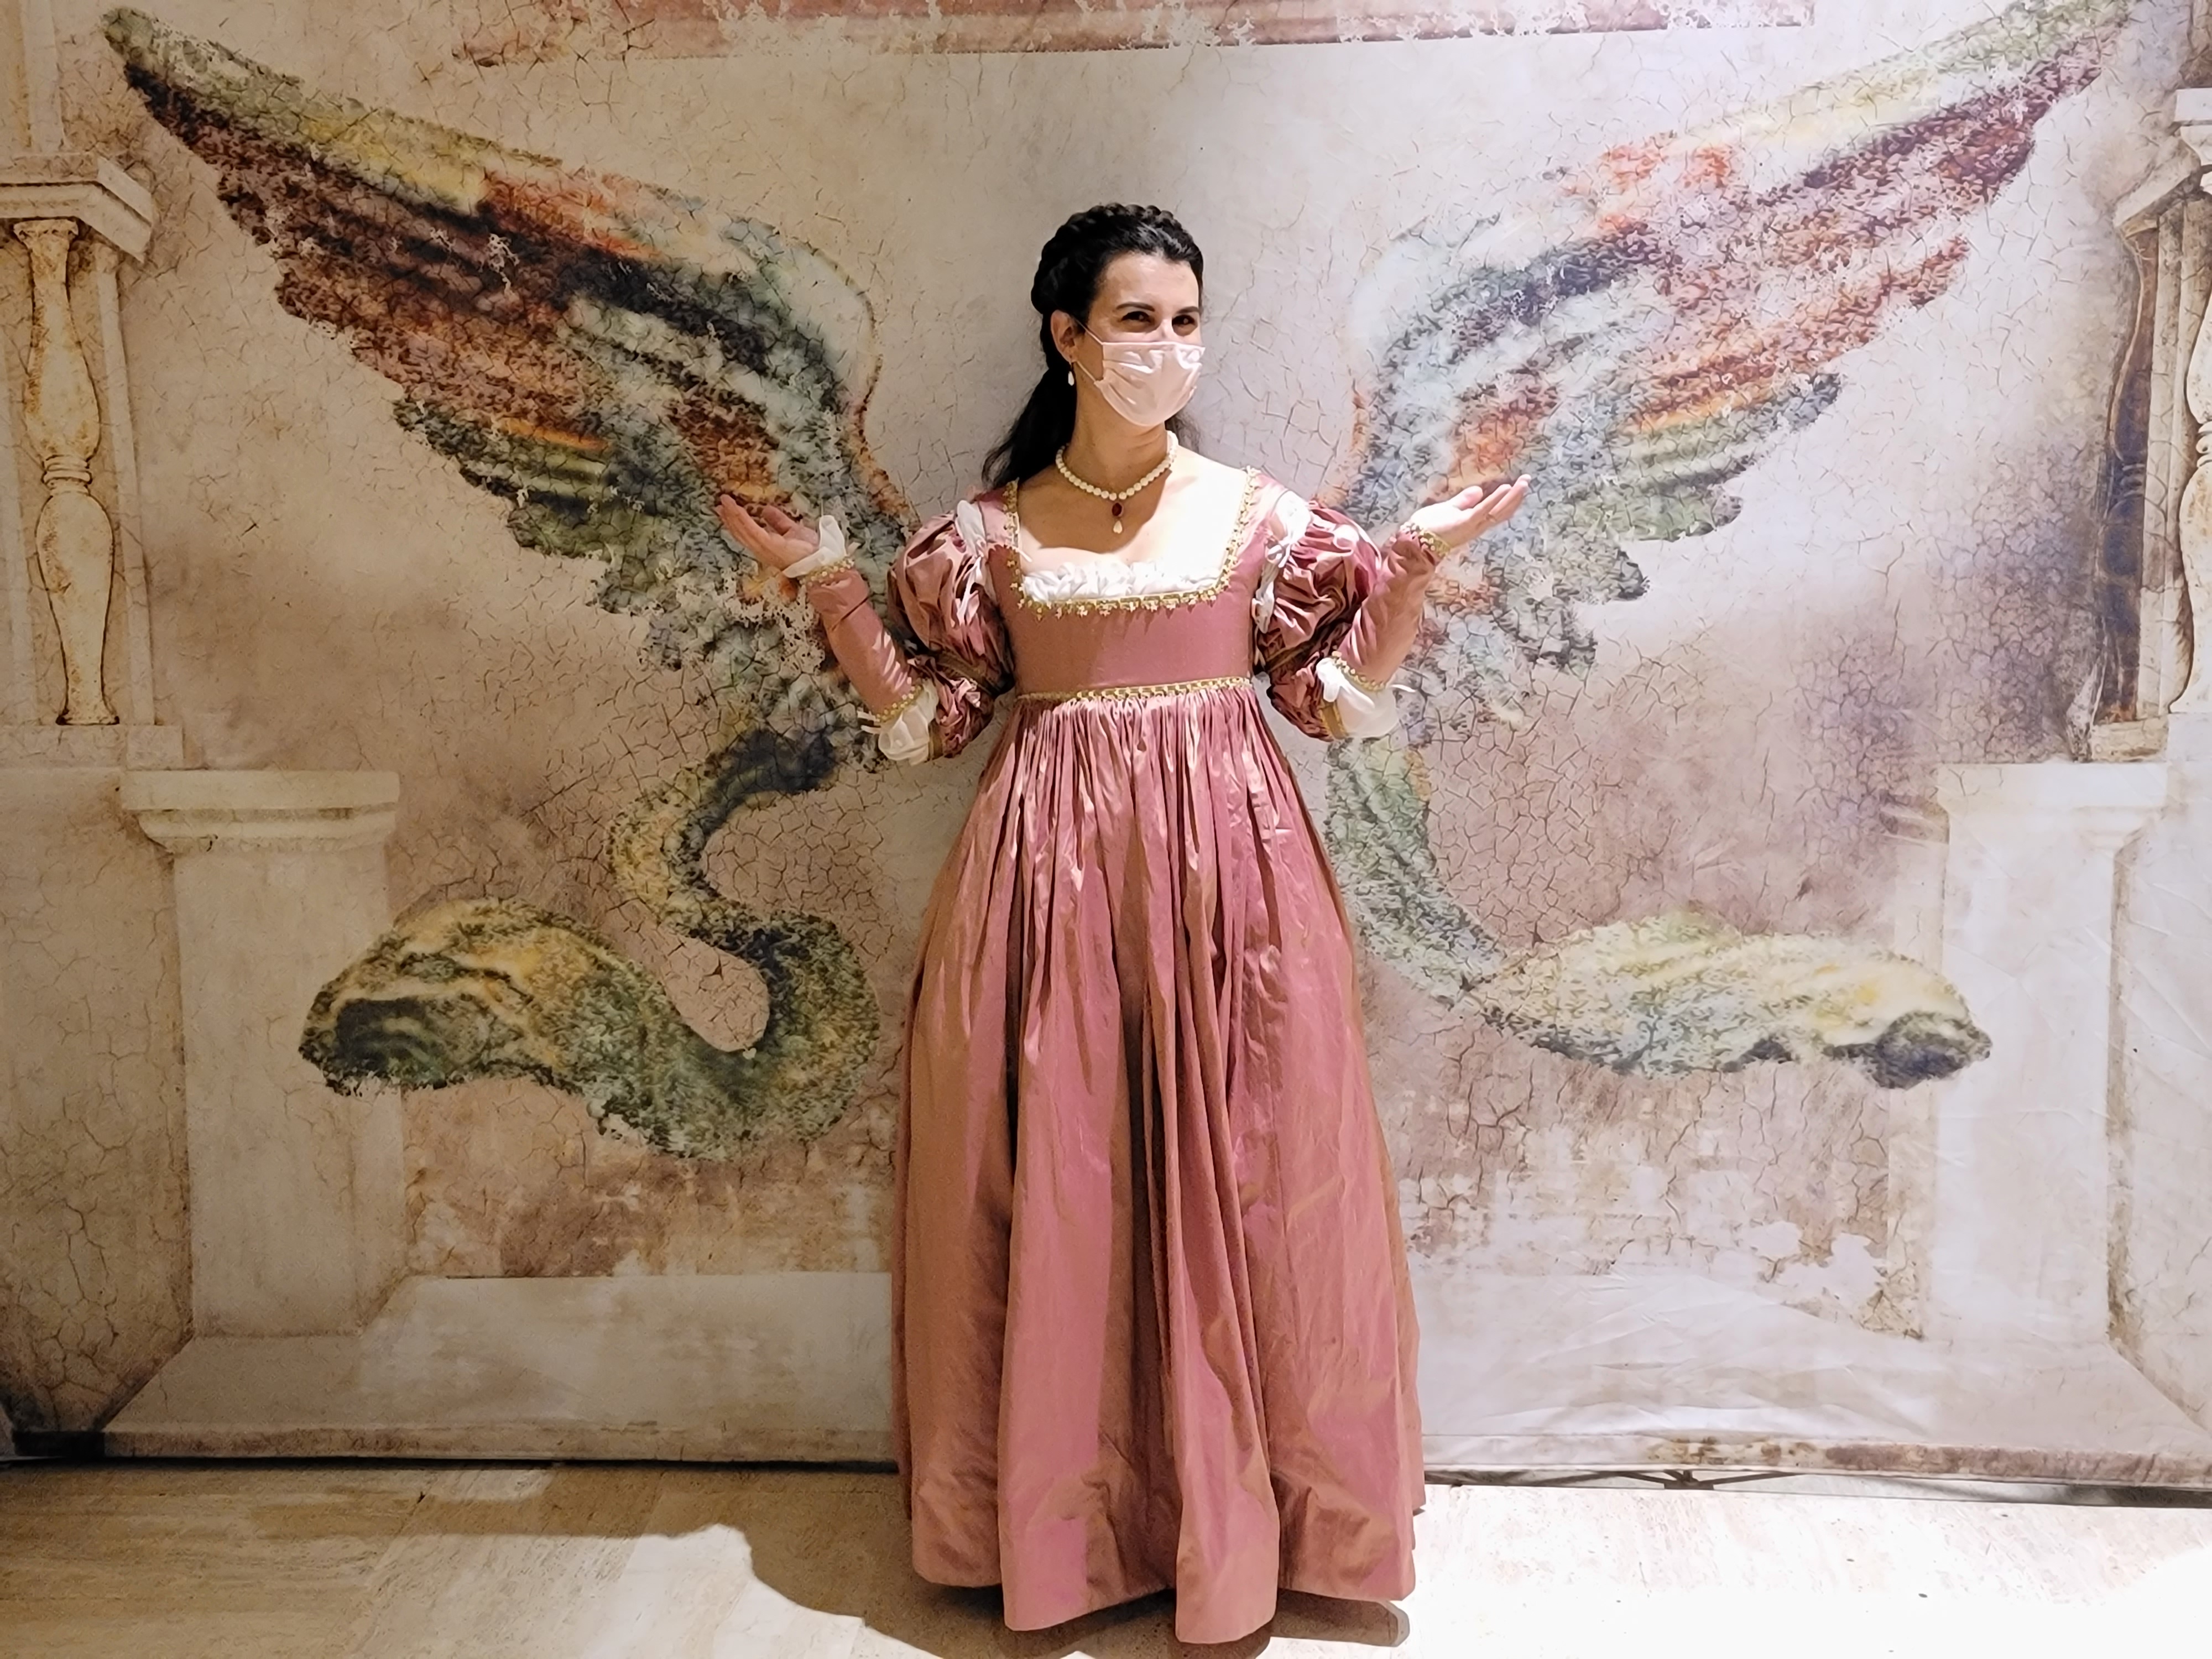
Inside the exhibit they had a little area to pose and we couldn't resist!


A look at the back view and my nice smooth back! My hair is much longer now so I would like to retry the hairstyle with more braids and gold trim. 

We took photos after so I am a wee bit wrinkled but I think this photo does a nice job of showing the silhouette I wanted and achieved.


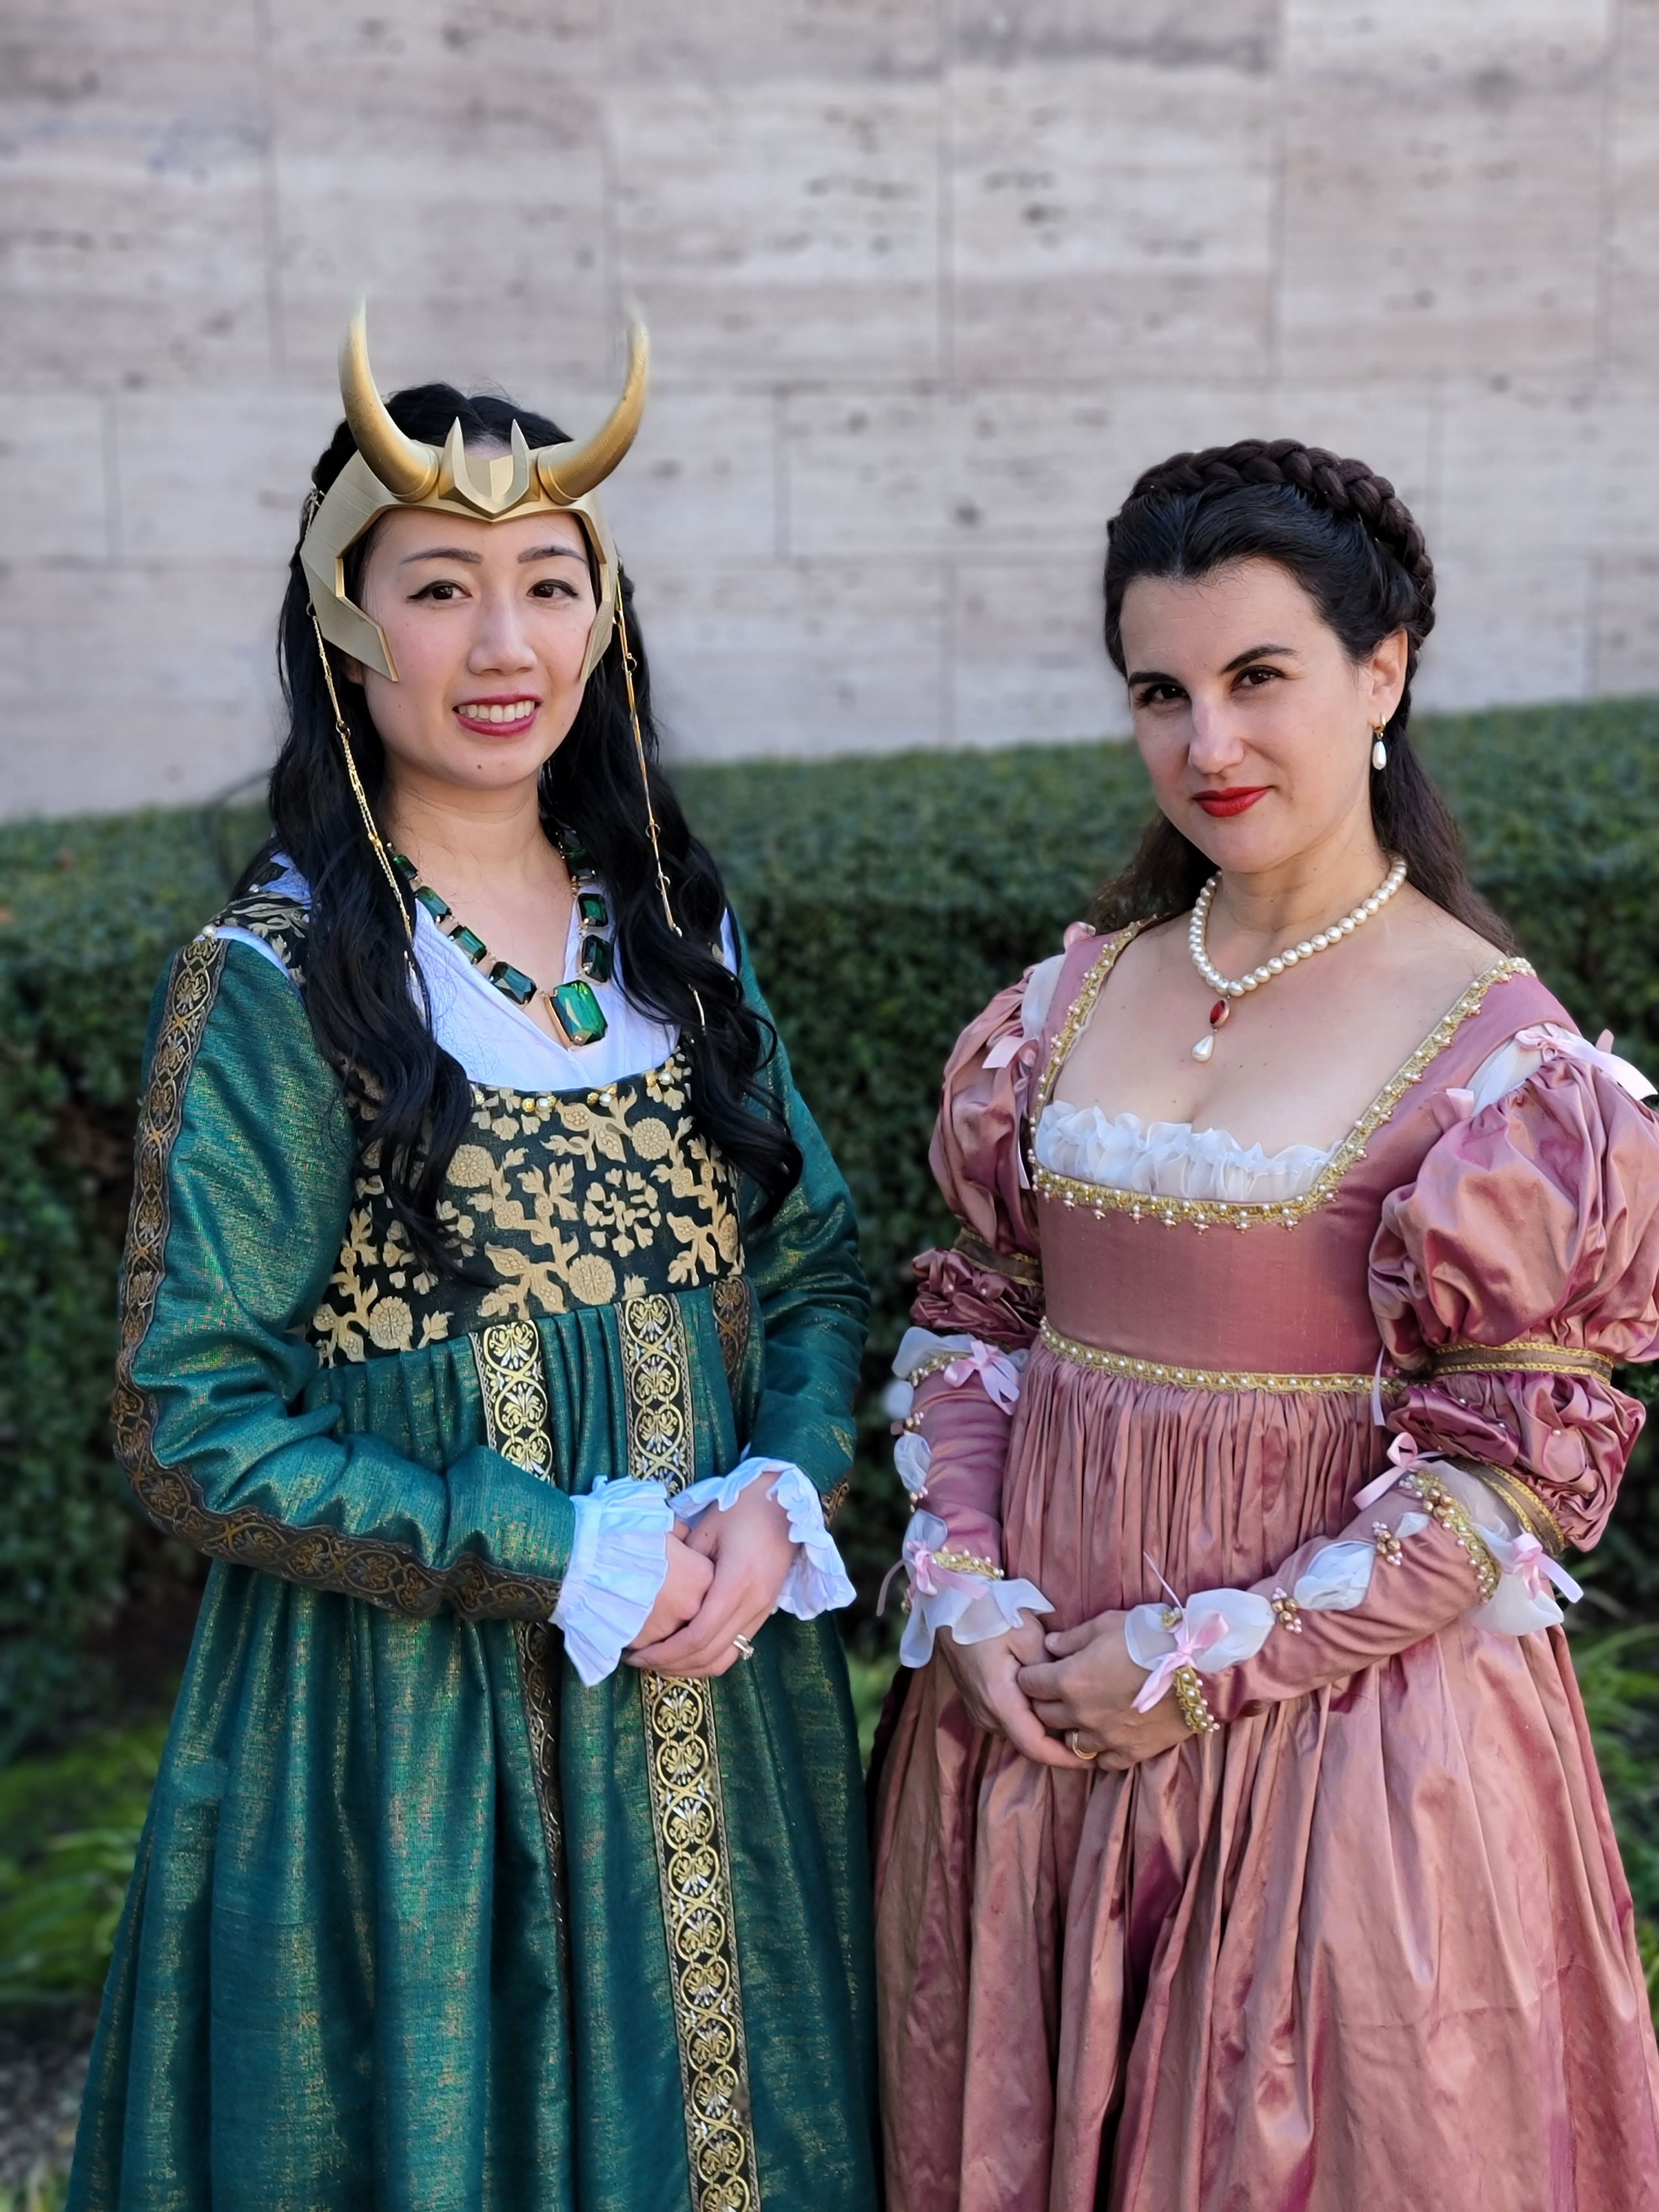
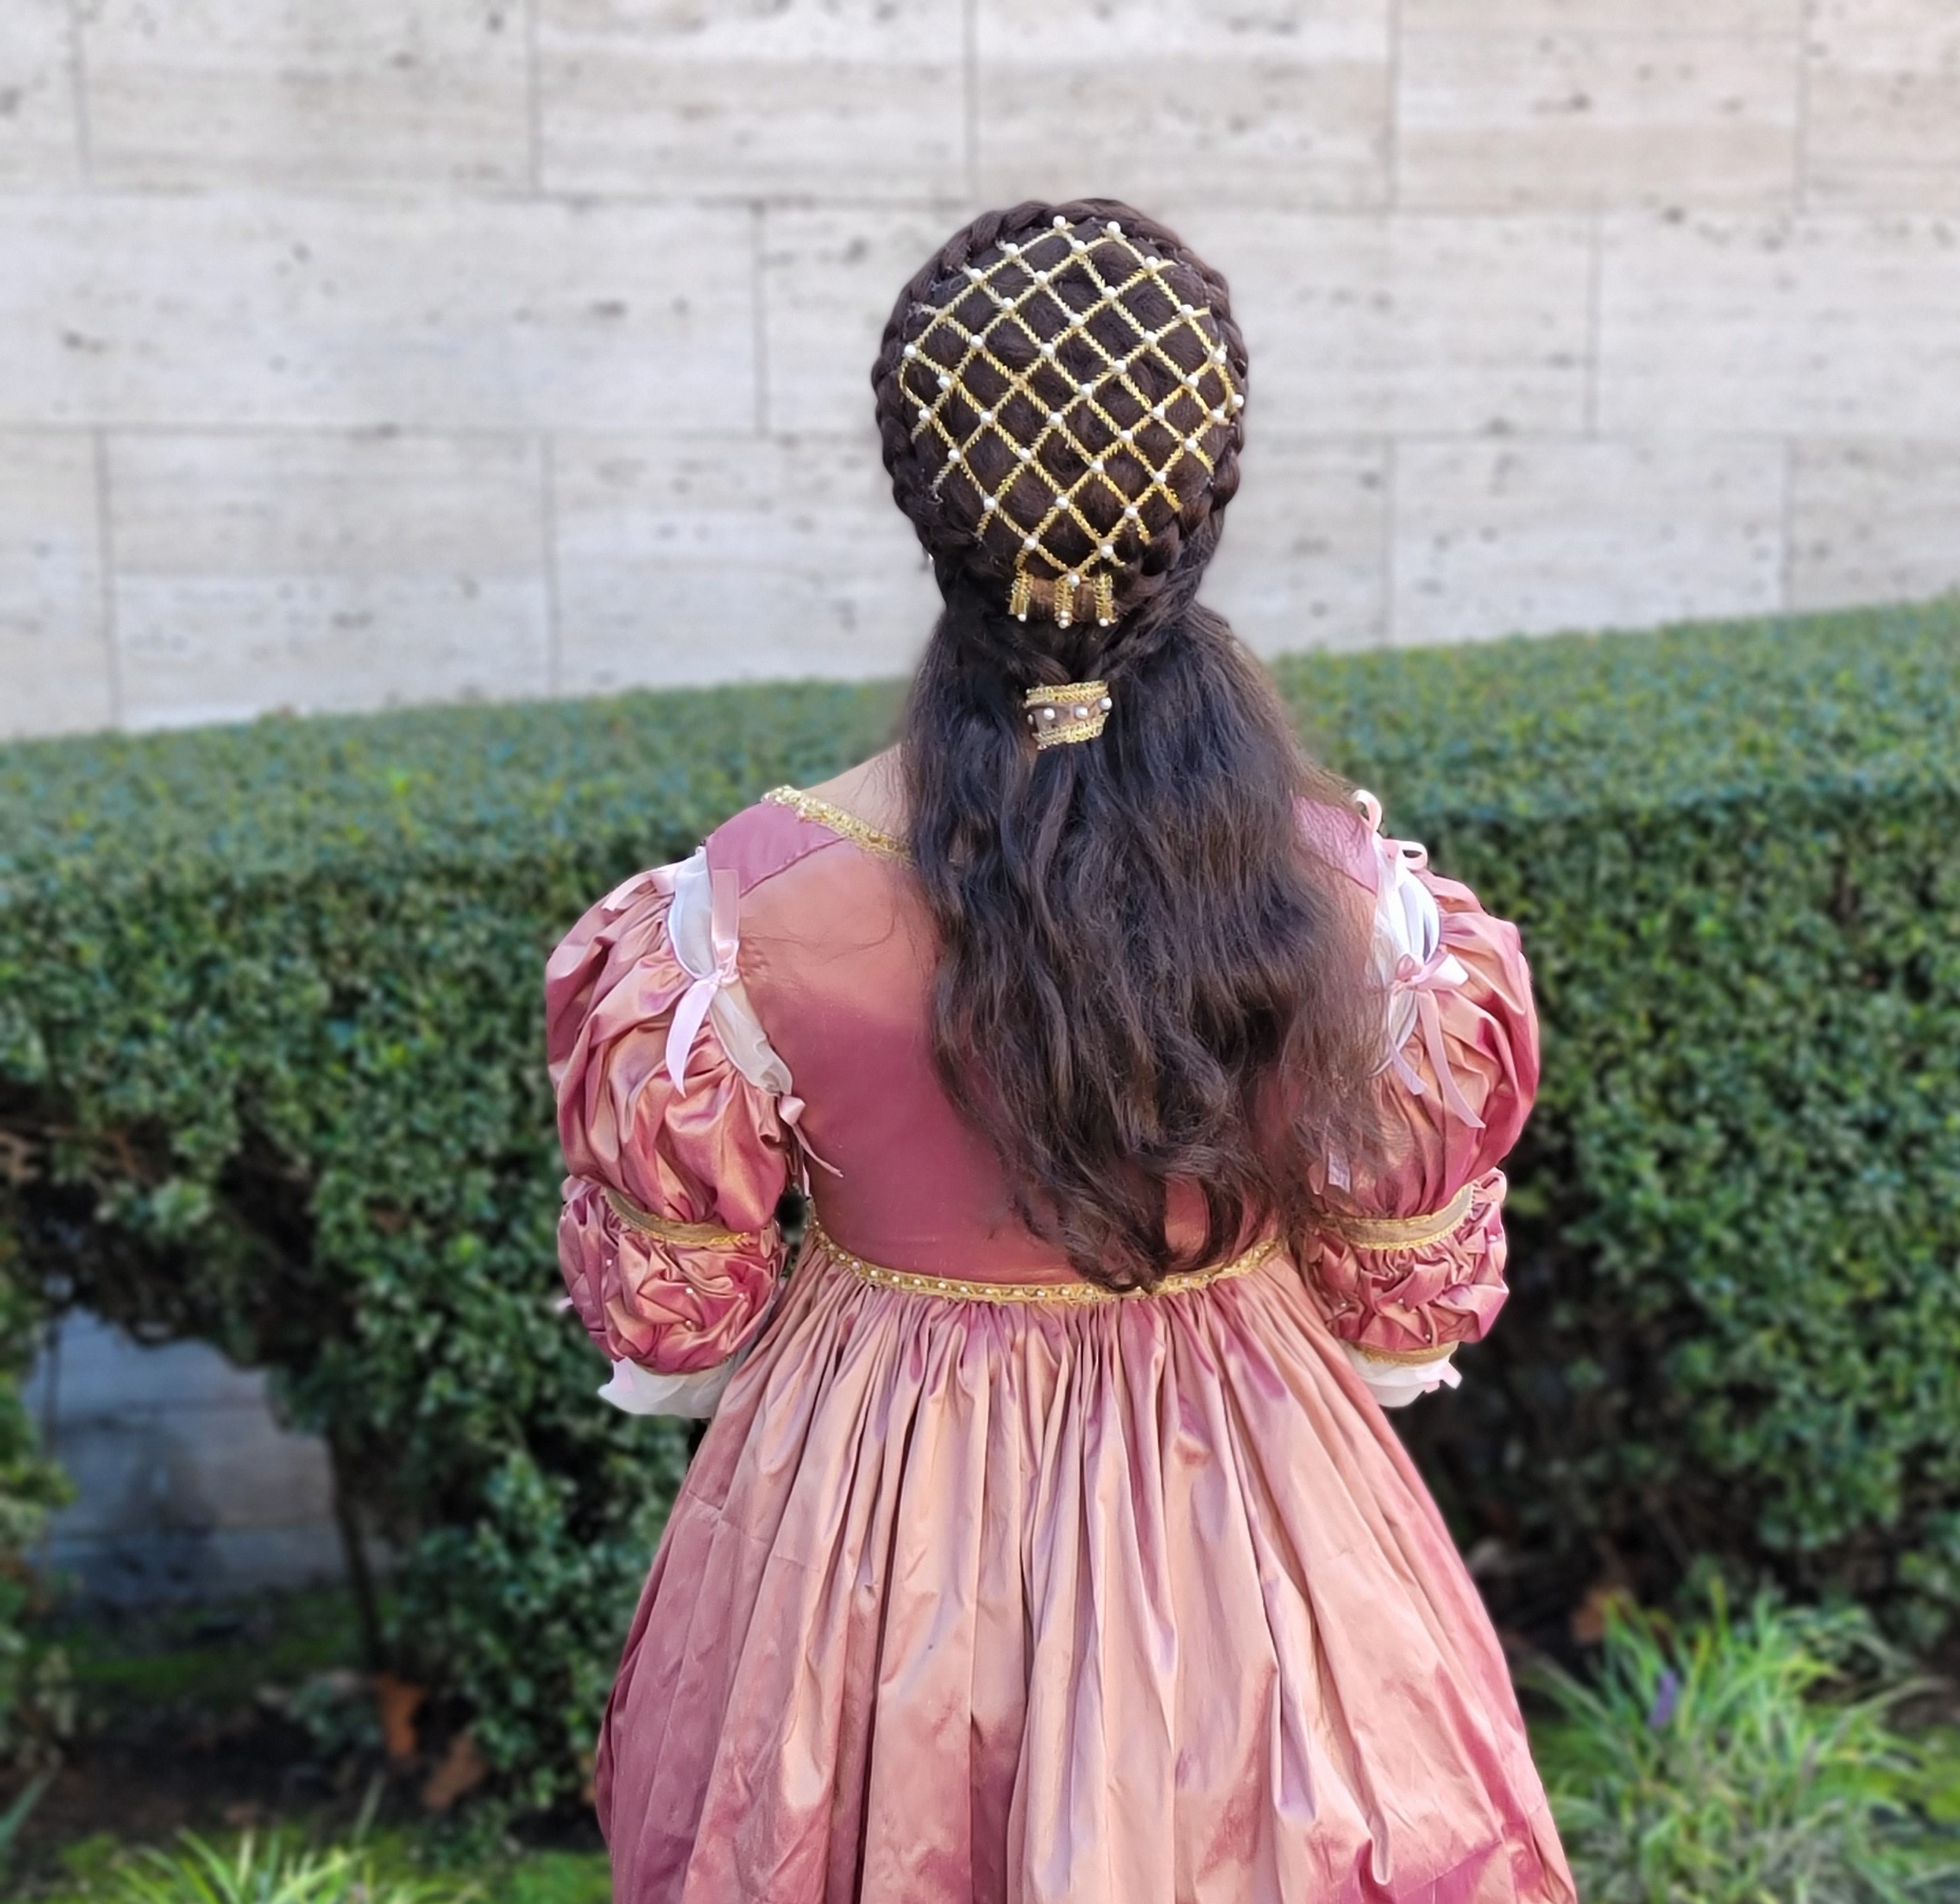
Vivien and I outside the exhibit. Vivien had a fabulous wig and Loki headpiece. I made a faux gold juilet cap with fake hair that I then pinned on top of my own. I wrapped my own hair around the juliet cap and just left it. I was very tired that morning and didn't have the energy to curl it. It happens. 


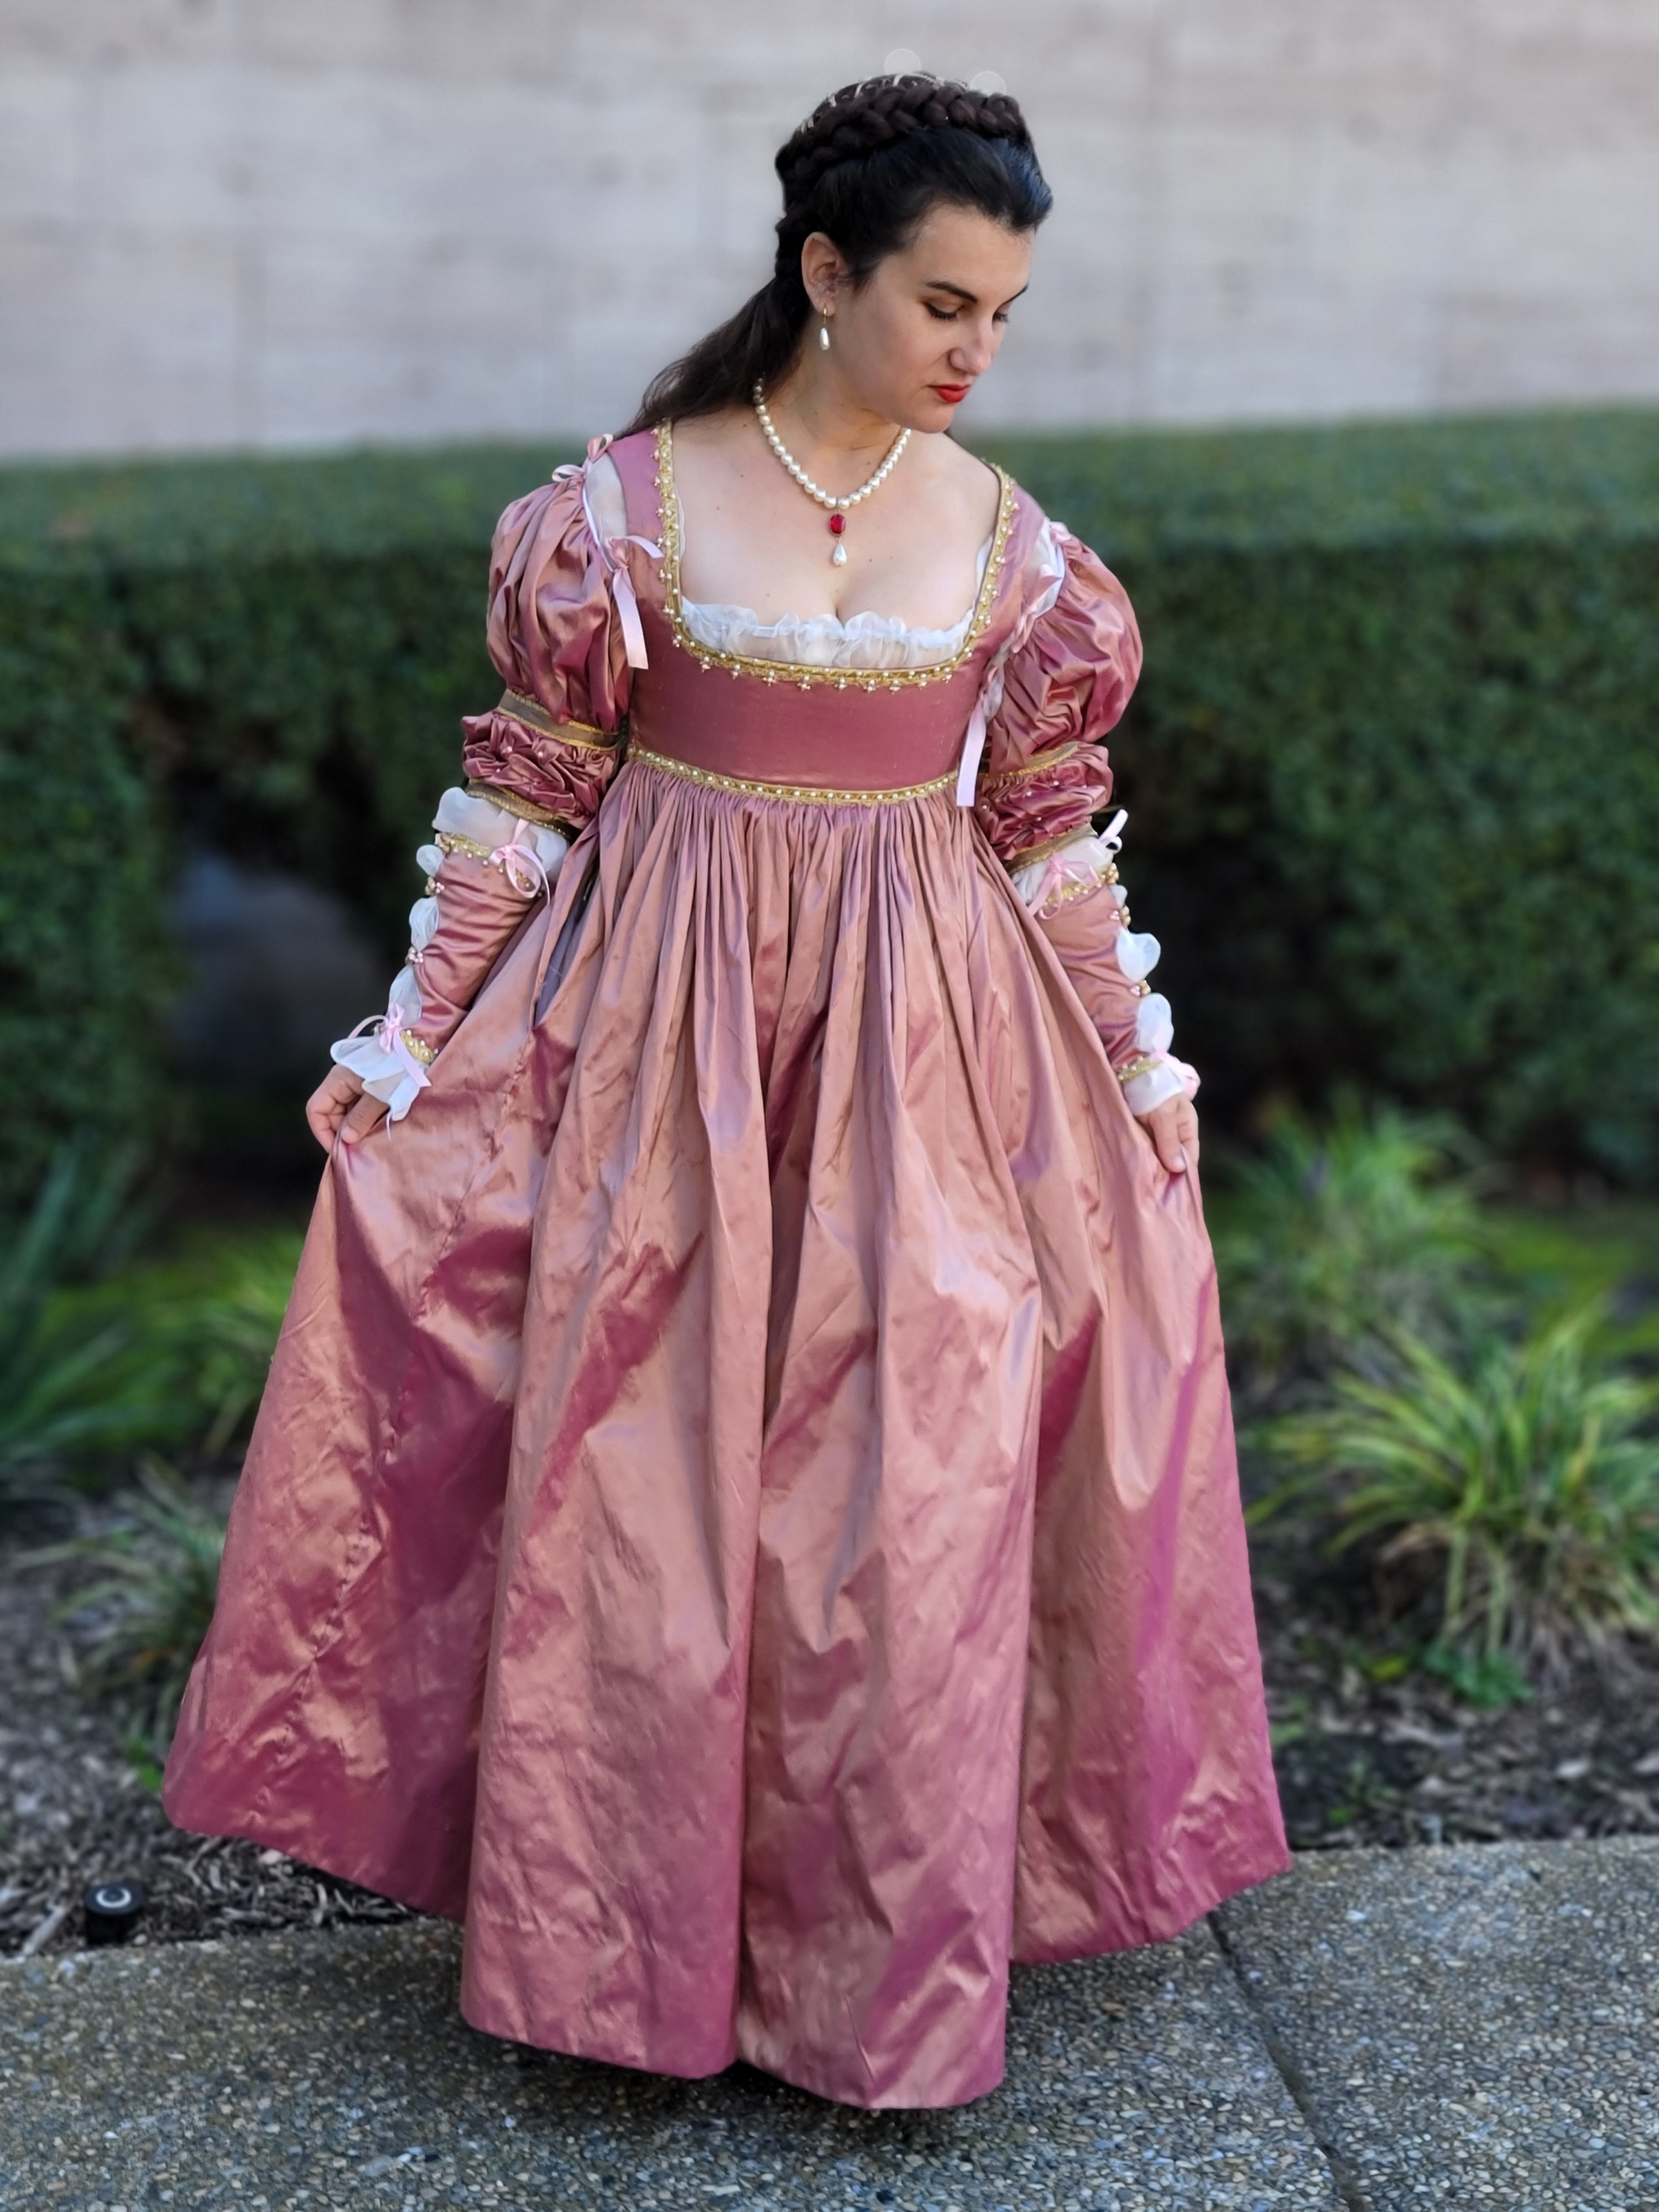
Some close ups to see the details. The silk really changes color in different light. I do not love the pink silk ribbon ties. I think I may replace with gold at some point.


Afterwards we went to a fabulous tea with lots of wonderful pastries!


Wednesday, February 5, 2020

1880's Cupcake Day Dress


The late 19th century has always been intimidating to me from a sewing standpoint. Complicated waist hugging bodices and layer upon layers of trim. My local costuming guild arranged a meet up at the James Tissot exhibit and I decided now was as good a time as ever to delve into the period. Tissot is all about capturing the lush big bustles and fanciful bonnets so I naturally wanted an 1870's gown with full skirts. Unfortunately I felt compelled to stick to a pattern because I was scared. That limited my options because I needed a pdf available. I started hunting for late bustle period inspiration (1880's). I decided on a light cotton seersucker with pink cotton accents. In the end I envisioned a Tim Burton-esque cupcake inspired daydress with velvet and lace trim.


Inspiration thanks to Pinterest!

I was lucky that I had a corset thanks to @thelacedangel and a bustle cage from @tmoore_vintagesewcialist.

Bustle petticoat in one that saved me a lot of work!

I used a pattern from Truly Victorian, the Alexandra bodice. I did a mock up, taking into consideration I hadn't yet made my skirts and therefore may need more room. I graded out the hips since I have a bigger waist to hip ratio. Surprisingly there was no hip measurement included on the pattern sizing so I just guessed! I had some issues cutting out the pattern because all the sizes were on the same pattern piece. As a result, at certain points the sizes all melded together into one thick line, making it impossible to determine where to cut. For someone looking for an exact pattern piece this can be extremely frustrating. I don't have a dressform yet so I put on my corset and bustle cage and did a quick try on.

Yay for a semi successful mock up

I went ahead and cut my cotton seersucker (from Joanns) and interlined with a nice cotton twill. I serged my interlining to my bodice pieces and sewed up the main bodice, minus the pink cotton center piece. I quickly made up the pink underskirt using the TV 1885 underskirt pattern. And then things went a bit wonky. 

This was the point of project I was excited because things looked ok so I tossed seersucker fabric over for pretend overskirt. You can see already that my center bodice pieces weren't long enough. I had no more twill so I decided to just keep them shorter rather than cut out new ones.

I would say the problems that ensued were 50% my fault and 50% this pattern was not right for me at all (I would've been better off using an actual 1880's pattern or creating my own). I wasn't focusing enough on the fit issues, which would later haunt me, beat me over the the head and then make me cry. There was pulling at the shoulders. I had taken them up so much I thought surely I couldn't do anymore. And then it was tight under my arms so I carved some fabric out to accommodate. The neck was too high (easy fix) and the hips still were just on verge of being too snug. And then the real blow- the sleevils.

I did a sleeve mock up and then cut out the sleeves. The pattern sleeve was all wrong for me so I basically redrafted. The elbow curve was in wrong spot and it was much too wide and then not big enough sleeve cap.The left side went in so easily. The right took 11 tries. No matter what I did it wouldn't set right, I had horrible dragging and it was too tight under my arm. Because I ripped it out so many times my fabric in the back started to stretch out (more on this later). I redid and created new mock up after disaster set 5. Mock up went fine and I recut a new sleeve. Still took another 6 times!
Finally it seemed ok. And by ok I really do mean ok. Not great, not smooth, just wearable. I deeply regretted this later on. 

Mock up and the "good" set


The right sleeve of doom. See that deep crease? It definitely hurt under my arm.

You can see the pulling at shoulders, even with a bigger and better set sleeve

I took a break and made a simple white petticoat and then trimmed my pink underskirt by hand pleating to get around 150 inches of fabric trim. I used the vinegar and water trick to set them, which really works! I did a very deep hem facing out of the same pink and sandwiched in a 4 inch strip of crinoline to give the skirt some oomph. It definitely helped with the shape. 

You can buy a pleating board but they have gone up in price. You can also make one but I was short on time. My pleats are not exact and perfect but I like them just the same.

Next was doing my hook and eyes, which always scares me. Closures always scare me. Its so FINAL. I then tried everything on to realize that my center bodice was too small, especially at center bust. What? How? Why? I had even laced down a half inch smaller in my corset. I still have no idea what happened. I created a placket on both sides, figuring it could just be a design feature. Thankfully I had purchased 18 velvet covered buttons and they did a nice job of hiding most of the placket anyway. I did too many hook and bars to count (bars seem to be more secure for me) and the bodice bareeeeeely fit. BUT IT FIT. Kind of. It was wearable, that was what mattered. 

Panel and yet another try on. It is so much fun not having a dressform, let me tell you.

I made a hat. I'd like to do separate blog post but I will probably run out of steam. I took a dollar tree straw hat and molded and cut and sewed to get my shape then threw on as many faux flowers as I could find. It is truthfully my favorite part of my outfit! I also made myself a baby yoda brooch and ordered earrings from Lady Detalle. I wore my American Duchess Thedas because they have some height and are very comfortable (which is important when one is in costume for 8 hours). And off I went to the event!


Fun accessories make an outfit!

A few more construction notes before the photo extravaganza. The pulling at the shoulders created a not attractive pulling through to front of bodice. Despite me finding actual period photographs of this, I did not like it. I wanted a very smooth bodice and did not achieve it. There was rippling at the shoulder seam as well. Due to resetting my sleeve so many times, my right side back had a large crease/bubble that was prominent. The bodice could've been shortened in the waist by 1/4 inch for smoother fit. I learned a valuable lesson in trusting my gut and having more confidence in my drafting skills. This pattern was not made custom for me so I didn't expect perfect but it was definitely a bad fit for my body type. The line soup,as I call it, did not help when cutting out the pattern but I suppose that is what mock ups are for. I probably needed four mock ups to get this one to where I wanted it.

 The seersucker was very loosely woven and tore in several places. In order to get that truly smooth high bust shelf bodice front I should have put small pads above my bust and next to underarms (this is period!). I did not do a good enough job securing my boning channels and some popped out and tore through my fabric. I should have added a flounce to my petticoat as it kept wrapping itself around my legs. My overskirt was draped on me and then sewn. I should have interlined and sewn it in places to my pink underskirt, because it ended up twisting and moving in the wind. As a result the bustle bit was on my side rather than center back. This list is more for me than anything but hopefully it may help you if you venture into the era.

And finally (if you have made it this far), I want to say that I am still happy I made this outfit. It is not my most favorite thing to wear and was extremely frustrating but as always it is something I created and so I am still proud I did it. Not all costumes will be a huge success and that is ok too. I learned many things and am hopeful the next time will be a bit smoother to do. I had a wonderful time at the events and that is truly the most important thing of all!

The event was a costumers guild meet up at the museum exhibit on James Tissot that I attended with my best friend and then a bunch of us got together to attend a lovely tea at a local hotel. Seeing everyone in their gowns was fantastic. What an amazing group of talented people! I was lucky enough to be captured by John Carey Photography and have credited him in my photos below. All other pictures taken by @rainbowpixiedust @makethishistoricallook, @madamedestroyer,@freshfrippery and @frolicking_frocks (all on instagram). You can see video and more on my facebook page, La Dauphine Costuming.


photos above by John Carey Photography